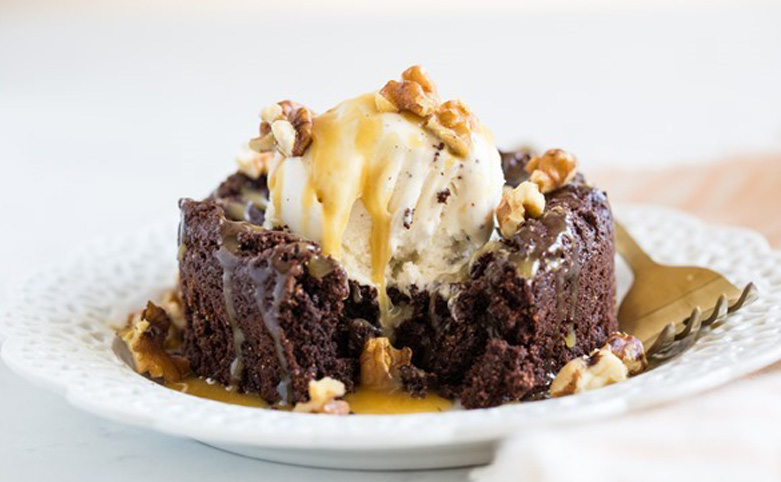
Vegan, gluten-free, grain-free
This two-serving brownie is fudgy and dense with a firm edge, and thanks to the almond butter base, there isn’t a stitch of flour! The nuttiness of the almonds and chopped dark chocolate enhance its rich chocolate flavour. This is a fantastic dessert when you want a decadent treat without being taunted by a pan of leftover brownies in the kitchen.
Yield: 2 servings
Prep time: 15 Minutes
Cook time: 23 Minutes
Ingredients:
For the brownies:
- 1 1/2 teaspoons (4 g) ground flax
- 1 tablespoon (15 mL) water
- 1/4 teaspoon (1 mL) fine sea salt
- Scant 1/8 teaspoon (0.5 mL) baking soda
- 1 tablespoon plus 1 teaspoon (20 mL) pure maple syrup
- 1/2 teaspoon (2.5 mL) pure vanilla extract
- 2 teaspoons (5 g) arrowroot starch
- 2 tablespoons plus 2 teaspoons (17 g) unsweetened cocoa powder
- 2 tablespoons (28 g) natural cane sugar
- 1/4 cup (60 mL) natural smooth almond butter
- 2 tablespoons (20 g) chopped dark chocolate or choc. chips
For the Magic No-Cook Caramel:
- 1 tablespoon plus 1 teaspoon (20 mL) coconut oil, melted
- 2 tablespoons (30 mL) pure maple syrup
- 1 tablespoon (15 mL) raw cashew butter
- 1 teaspoon (5 mL) coconut nectar or pure maple syrup*
- A good pinch of fine sea salt
Directions:
- Preheat the oven to 350°F (180°C) and place the oven rack in the middle position. Lightly grease a 4-inch ramekin (or two small, 3-inch ramekins) with oil.
- In a medium mixing bowl, whisk together the ground flax and water. Let it sit for a couple of minutes.
- To the flax mixture, add the salt, baking soda, maple syrup, vanilla, and arrowroot starch; whisk vigorously until smooth.
- Add the cocoa powder and sugar; stir with a spoon until combined. The batter will be very thick.
- Stir in the almond butter and chopped chocolate until thoroughly combined. Mix the dough for 30 to 60 seconds, until you can’t see any “ribbons” of almond butter in the dough.
- Scoop the dough into the prepared ramekin(s). Press down on the dough with your fingers until even and smooth.
- Place the ramekin(s) directly onto the rack, and bake for about 22 to 25 minutes, until the brownie has risen nicely, but is still soft to the touch.
- When it’s ready, the middle will still look a bit underdone. A toothpick inserted into the middle won’t come out clean. Shortly after removing from the oven, the middle will sink, but this is all normal. Pinky swear!
- Place the ramekin(s) on a cooling rack for about 25 to 30 minutes.
- Meanwhile, prepare the Magic No-Cook Caramel Sauce. Add all of the caramel sauce ingredients into a mini food processor, and process until smooth. Or you can simply add it to a small bowl and beat it with an electric mixer. Transfer to a small jar.
- You can serve the brownie in the ramekin, or you can slide a knife around the edge and carefully pop it onto a plate. Serve it with a scoop of ice cream (totally optional), a drizzle of caramel sauce, and a small pinch of coarse sea salt. I like to scatter on some toasted walnuts for a little crunch, too.
- Any leftover brownie (I doubt you’ll have any, though!) can be stored in an airtight container in the fridge for a few days. You can also wrap the cooled brownie individually in tin foil and place it into an airtight container or bag in the freezer for 3 to 4 weeks. If you have leftover caramel sauce, it’ll keep in an airtight container in the fridge for a week or so.
Tips:
* The coconut nectar has a slightly tangy flavour which is why it works well in this caramel sauce, but if you don’t have any on hand feel free to use maple syrup in its place. It’ll work just fine!
The caramel sauce makes 1/4 cup (60 mL). If you don’t want that much, you can cut the recipe in half and whisk everything by hand in a small bowl.

Leave A Comment